
| January 19, 2017 | 0 |
WooCommerce Plugin Setup For New Users
WooCommerce is the most popular WordPress plugin for building fully functional e-commerce sites. If you haven’t used WooCommerce. you can start with this blog in detail. Here we take the necessary configuration options and show you how to add products into your e-commerce site.
#1- Start with WooCommerce
Firstly, download and install WooCommerce from WordPress plugin directory. Once you activate it, the plugin will create two new menu items WooCommerce and Products in your website dashboard.
The WooCommerce menu is used for setting up the online shops, and the Products menu is used to add, edit and manage the products.
A banner will be displayed on top of your WordPress dashboard, which will take permission to install the necessary pages for WooCommerce. Click on ‘Install WooCommerce Pages‘ to create the pages. Once you are done, the banner will vanish.
#2- let Setup Your Online Store
Before adding the products, let’s show you how to set up your online shop first. To access the settings page, go to WooCommerce -> Settings. The settings page is divided into several steps. After making changes in each tab, remember to click the ‘Save Changes’ button.
a.) General Options

In this section, the base location of your online shop define and identify which countries you want to sell. You can choose either all countries or specific countries only. You can also enable a site-wide notice from this section. To do that, check the ‘Store Notice’ box and provide the message in the following box.
b.) Products
This tab lets you choose the settings options for the products.

This section has two types of options. From ‘Measurements’, you can choose the weight and dimensions units for your products.
And ‘Reviews’ allows you to enable product ratings, reviews and choose to accept reviews from verified owners only.
Display
This section lets you define the shop page, what to display in that page, default product sorting and add to cart behavior.
Below, you can provide custom dimensions for catalog images, single product Image, product thumbnails, product image gallery, etc.
Inventory
This section consists of the options related to inventory management. Enable the feature by checking the ‘Enable stock management‘ box. Then, you can define the notification recipient when to send the information, threshold for low stock and out of stock, stock display format, etc.
Downloadable Products
If you are offering digital products, you can choose the download method from this section. It is also possible to require the users to be logged in and allow the products to be downloaded when the order is being processed.
c.) Tax

This is a crucial and complicated section for your online store. Here, you can define the tax related options for your website.
Check the ‘Enable taxes and tax calculations‘ box to enable tax. Then, you have to choose whether the price should be displayed with or without taxes.
The ‘Calculate Tax Based On‘ field lets you decide how the tax should be calculated. You can choose to calculate tax based on the billing address, customer’s address or the shop address. If your tax law allows it, you can enable tax rounding by checking the next box.
WooCommerce lets you combine tax related options for particular product or location into classes.
By default, three classes are created for you – Standard, Reduced Rate, and Zero Rate.
You can add more classes by providing the name in the Additional Tax Classes field. The tax classes could be customized by clicking on the class name from the top section.
In the next few options, you can choose how the tax should be displayed in the shop, cart, and checkout pages, etc.
d.)Checkout
From this section, you can customize the options related to checkout.
Checkout Process

If you want to provide coupons or allow guest checkout, you can do that by checking the respective boxes. And if you have SSL certificate for your online shop, you can make sure HTTPS is being used in the checkout page by checking the ‘Force Secure Checkout‘ page.
Checkout Pages
The three options of this section let you choose the pages for the cart, checkout, and ToS. Click the drop-down menu and select the appropriate page for each option.
Checkout Endpoints
Endpoints are the extension to the URL when various actions are performed by the user. You have to provide unique endpoints for each action. In most cases, the default parameters would be just fine.
e.) Payment Gateways
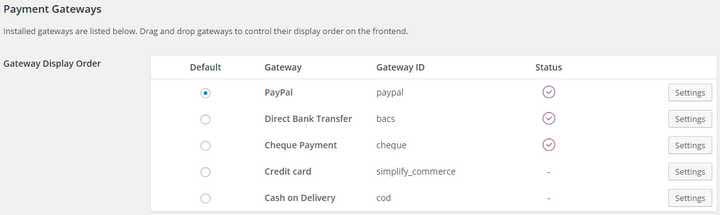
This is one of the important and tough settings section for your online shop. From this section, you can choose the payment methods for your customers. The free version comes with five payment gateways. You can add more by purchasing addons.
You can change the order of the available payment methods by dragging and dropping them up and down. The customers will see the payment methods exactly as you arrange them here. You can also choose any of them as the default payment method.
You will find links to detailed setting options for each payment method on top of the page.
f.) Shipping

As the name suggests, here you can define the shipping methods for your online store. Unless you are selling digital products, you need to check the Enable shipping box. You can also choose to enable the shipping calculator on the cart page and hide the shipping costs until the customer provides an address.
The Shipping Display Mode lets you choose the display mode for shipping methods – radio or dropdown.
Shipping Destination allows you to choose the default shipping address for the products. If you provide transportation service to specific countries only, you can do so from the Restrict shipping to Location(s) section.
Below, you will find the available shipping methods. Like the payment gateways, you can rearrange them and choose a default method. You can customize the shipping method options from the top section.
g.) Accounts
You can set up the account settings from this tab.

Account Pages
Despite the name, here is only one option to set the ‘My Account’ page.
My Account Endpoints
Here, you need to provide unique parameters for various account related actions. If you are unsure, you can leave the default parameters as they are.
Registration Options
In the ‘Enable Registration‘ section, you can allow the users to register from the checkout and my account pages.
You can choose to auto-generate the username and password in the ‘Account Creation’ section.
h.) Emails
From this section, you can customize various email options for your e-commerce site.
Email Sender Options
Here, you can provide custom name and email address for the sender of the emails.
Email Template
In this section, you can provide a header image, add footer text and choose custom colors for the base, background, email body text, and background, etc.
On top of the page, you will find separate links to customize emails for various actions like the new order, canceled order, completed order, reset the password, new account, etc.
i.) Managing Products
Now that you have set up your online store let’s see how to add products to your website. Go to Products -> Add Product.

While the upper portion of the page looks almost like the new post editor, you will find product related options in the lower part. Provide the product name and a short product description. Then, move to the ‘Product Data‘ section below.
First of all, choose the product type. The configurable options will vary depending on the product type. Simple product is a regular product with no particular attributes. Group product is a set of related products.
You are just providing a link to the product. A variable product has several variations with different specifications.
If you are selling any digital or virtual product, select ‘Simple product‘ and then check the appropriate box.
General

The first option lets you choose a custom SKU for the product. Then, you can choose the regular price and sale price (if any) of the product. If it is a downloadable product, you need to add the downloadable files and set the download limit and the download expiry date.
#3- Inventory
By checking the ‘Manage stock‘ box, you can enable stock management for the product. From the ‘Stock status‘ field, you can set the product as available or out of stock. Check the ‘Sold Individually‘ box when only one item is bought per order.
#4- Shipping
In this section, you can specify the product weight and dimensions. If there is any shipping class for the product, you can choose that from the ‘Shipping type’ drop-down menu.
#5- Linked Products
By adding up-sell and cross-sell products, this section lets you increase your conversion rate. Up-sell products will displayed in the product page. And cross-sell products will shown in the cart page. Lastly, if the product belongs to any group, you can select the group from the ‘Grouping’ field.
#6- Attributes
Attributes provide additional information about the product. For instance, if you are selling a jersey, you can include size, color, type, etc. as the attributes of the product.
To add a new attribute, click ‘Add‘. Then, provide the attribute name and the value(s). You can choose display the attributes in the product page by checking the ‘Visible on the product page‘ box.
#7- Advanced
If you want to send any additional message to the buyers of the product, provide the text in the Purchase Note field. The Menu Order field lets you choose a custom ordering position for the product. Lastly, check Enable reviews box to enable user reviews for the product.
On the right side, you can add tags, category, featured image and image gallery for the product. After providing all the necessary information, click Publish.
You can view all the products in the Products -> Products page. For each product, there are several options Edit, Trash, View, Duplicate, etc.
